
Deep dive: Hybrid Identity using Azure AD Connect Cloud Sync
Deep dive: Hybrid Identity using Azure AD Connect Cloud Sync

Today, businesses are often becoming a mixture of on-premises and cloud applications. Users require access to applications both on-premises and in the cloud. This design requires the need to have a single identity across these various on-premises and cloud applications.
Organizations with an on-premises Active Directory Domain Services (AD DS) domain or forest can synchronize their AD DS user accounts, groups, and contacts with the Azure AD tenant of their Microsoft 365 subscription. This design is known as hybrid identity for Microsoft 365.
When an organization with an on-premises Active Directory plans to implement Microsoft 365, it must bring its on-premises accounts into Azure Active Directory. Doing so enables its users to use Microsoft 365’s cloud services, such as Exchange Online, SharePoint Online, Teams, and so on. To support Microsoft 365, most organizations want to avoid creating new user accounts in Azure AD, and instead use their existing on-premises accounts. While providing greater efficiency, this design also saves them from having to manage different passwords for each account.
Integrating on-premises directories with Azure AD makes users more productive by providing a common identity for accessing both cloud and on-premises resources. Users and organizations can take advantage of the following features:
- Users can use a single identity to access on-premises applications and cloud services such as Microsoft 365.
- Organizations can use a single tool to provide an easy deployment experience for synchronization and sign in. There are two options to choose from to implement user account synchronization between on-premises AD and Azure AD - Azure AD Connect sync and Azure AD Connect Cloud Sync.
First of all, let’s take a trip down memory lane with a little overview of the currently most used synchronization tool for hybrid identity in Microsoft 365, Azure AD Connect.
Azure AD Connect
Azure AD Connect sync is an on-premises Microsoft application that’s designed to meet and accomplish your hybrid identity goals. It’s typically installed on an on-premises domain-joined server, although it can be installed on a domain controller. Its only requirement is an outbound HTTPS connection to Microsoft 365 servers.
Azure AD Connect sync (formerly known as Dirsync and AD sync) was the first solution built for provisioning from on-premises AD to Azure AD. It currently has support for the most Azure AD hybrid scenarios, and it can support organizations with large directories. While Azure AD Connect sync is robust in its capabilities, it can also:
- Require a heavy investment in infrastructure resources.
- Be complicated to configure.
- Result in higher maintenance costs.
Azure AD Connect comes with several features you can optionally turn on or are enabled by default. Some features may require more configuration in certain scenarios and topologies.
What is Azure AD Connect Cloud Sync?
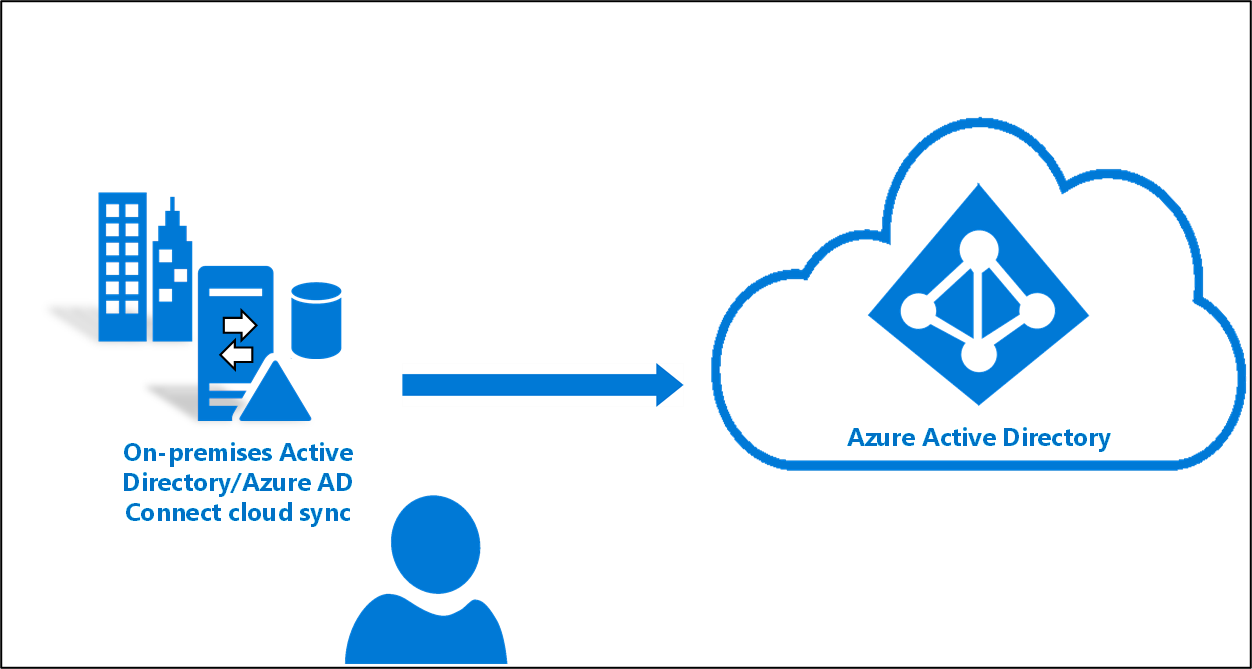
Azure AD Connect cloud sync is a new offering from Microsoft designed to meet and accomplish your hybrid identity goals for synchronization of users, groups, and contacts to Azure AD. It accomplishes this by using the Azure AD cloud provisioning agent instead of the Azure AD Connect application.
Azure AD Connect Cloud Sync
Azure AD Connect Cloud Sync is also designed to meet and accomplish an organization’s hybrid identity goals for synchronization of on-premises users, groups, and contacts to Azure AD. Since Azure AD Connect Cloud Sync and Azure AD Connect sync both synchronize identities, what makes them different? While the next section outlines the feature differences between these two directory synchronization tools, suffice it to say that Azure AD Connect sync, which is based on older synchronization technology, requires a greater investment to deploy and support. By comparison, Azure AD Connect Cloud Sync uses a lightweight agent design that requires a minimal on-premises footprint. It also enables organizations to manage all their provisioning configuration in the cloud.
With Azure AD Connect Cloud Sync, provisioning from on-premises Active Directory to Azure AD is orchestrated in Microsoft Online Services. An organization only needs to deploy, in their on-premises or IaaS-hosted environment, a light-weight agent that acts as a bridge between on-premises Active Directory and Azure AD. The provisioning configuration is stored in Azure AD and managed as part of the service.
Azure AD Connect Cloud Sync supports most of the common Azure AD hybrid scenarios, with one major exception - Exchange hybrid deployments.
⚠️ Warning An Exchange hybrid deployment allows for the co-existence of Exchange mailboxes both on-premises and in Microsoft 365. In an Exchange hybrid deployment, Azure AD Connect synchronizes a specific set of attributes from Azure AD back into the organization’s on-premises directory. However, the cloud provisioning agent for Azure AD Connect Cloud Sync doesn’t currently synchronize these attributes back into the on-premises directory. Therefore, organizations that plan to implement an Exchange hybrid deployment must use Azure AD Connect sync.
For organizations that don’t have, or that don’t plan to have an Exchange hybrid deployment, Azure AD Cloud Sync offers several advantages over Azure AD Connect sync. One of the major reasons to consider choosing Azure AD Cloud Sync is cost savings. Because Azure AD Cloud Sync uses a lightweight agent, organizations don’t have to deploy a robust server in their data centers to run the service. And while Azure AD Connect sync requires SQL Server for larger deployments, that’s not the case with Azure AD Cloud Sync. This design can potentially save and organization money on licensing costs. Along with the infrastructure savings, organizations will also spend less on support and maintenance throughout the life of the service due to its simplified architecture.
Due to its smaller on-premises footprint and multi-agent support, Azure AD Connect Cloud Sync is easier to set up. It also provides resiliency that isn’t available in Azure AD Connect sync. This design enables organizations to get Azure AD Connect Cloud Sync up and running in their deployments in a fraction of the time spent deploying Azure AD Connect sync. The simple setup is intuitive and streamlined, which enables end users to start collaborating quickly and seamlessly with minimal effort.
An organization can also deploy multiple agents to provide high availability and automatic failover. This design prevents service outages due to a server or network failure. As a result, end user frustration is eliminated. Support calls are also reduced for things like unprovisioned users and outdated group memberships.
ℹ️ Note The cloud provisioning agent does not load balance if you have multiple agents installed. Only one agent is ever active.
Azure AD Cloud Sync is also the ideal solution if you find yourself needing to provision users from multiple Active Directory forests that have no network connectivity between them. This scenario is often the case in complex business arrangements such as mergers and acquisitions. Azure AD Cloud Sync enables an organization to deploy agents into each of the isolated networks that can communicate independently between the forest and the respective network and Azure AD. And if you already have Azure AD Connect sync deployed in your environment, that doesn’t exclude you from deploying Azure AD Cloud Sync to that environment as well. Azure AD Cloud Sync can be used side by side with Azure AD Connect sync.
And lastly, Azure AD Cloud Sync can keep Azure AD up-to-date with greater frequency than Azure AD Connect sync. As such, organizations no longer have to wait 30 minutes for on-premises changes to be seen in Azure AD, as is the case when using Azure AD Connect sync.
Azure AD Connect vs. Azure AD Connect Cloud Sync
One of the primary differences between the two tools is where the provisioning configuration is stored and where provisioning occurs:
- Azure AD Connect sync. The provisioning configuration is stored on the on-premises sync server. Provisioning also runs on the on-premises sync server.
- Azure AD Connect Cloud Sync. The provisioning configuration is stored in the cloud. Provisioning also runs in the cloud as part of the Azure AD provisioning service.
The following table provides a comparison of the features in Azure AD Connect and Azure AD Connect Cloud Sync (as per january 2023):
| Feature | Azure AD Connect | Azure AD Connect Cloud Sync |
|---|---|---|
| Connect to single on-premises AD forest | ✔ | ✔ |
| Connect to multiple on-premises AD forests | ✔ | ✔ |
| Connect to multiple disconnected on-premises AD forests | ✔ | |
| Lightweight agent installation model | ✔ | |
| Multiple active agents for high availability | ✔ | |
| Connect to LDAP directories | ✔ | |
| Support for user objects | ✔ | ✔ |
| Support for group objects | ✔ | ✔ |
| Support for contact objects | ✔ | ✔ |
| Support for device objects | ✔ | |
| Allow basic customization for attribute flows | ✔ | ✔ |
| Synchronize Exchange online attributes | ✔ | ✔ |
| Synchronize extension attributes 1-15 | ✔ | ✔ |
| Synchronize customer defined AD attributes (directory extensions) | ✔ | |
| Support for Password Hash Sync | ✔ | ✔ |
| Support for Pass-Through Authentication | ✔ | |
| Support for federation | ✔ | ✔ |
| Seamless Single Sign-on | ✔ | ✔ |
| Supports installation on a Domain Controller | ✔ | ✔ |
| Support for Windows Server 2016 | ✔ | ✔ |
| Filter on Domains/OUs/groups | ✔ | ✔ |
| Filter on objects’ attribute values | ✔ | |
| Allow minimal set of attributes to be synchronized (MinSync) | ✔ | ✔ |
| Allow removing attributes from flowing from AD to Azure AD | ✔ | ✔ |
| Allow advanced customization for attribute flows | ✔ | |
| Support for password writeback | ✔ | ✔ |
| Support for device writeback | ✔ | |
| Support for group writeback | ✔ | |
| Support for merging user attributes from multiple domains | ✔ | |
| Azure AD Domain Services support | ✔ | |
| Exchange Hybrid writeback | ✔ | |
| Unlimited number of objects per AD domain | ✔ | |
| Support for up to 150,000 objects per AD domain | ✔ | ✔ |
| Groups with up to 50,000 members | ✔ | ✔ |
| Large groups with up to 250,000 members | ✔ | |
| Cross domain references | ✔ | ✔ |
| On-demand provisioning | ✔ | ✔ |
| Support for US Government | ✔ | ✔ |
Why move from Azure AD Connect to Azure AD Connect Cloud Sync?
| Azure AD Connect | Azure AD Connect Cloud Sync | |
|---|---|---|
| Infrastructure | Heavy on-prem footprint | Lightweight agent |
| Deployment | Complex and time consuming | Quick and easy to setup w/configuration managed from Azure AD |
| Cost | Expensive | Low costs |
| Resilliency | No high availability | High availability |
| Performance | Sequential sync when connecting multiple source | Parallel sync accross multiple sources |
| AD Consolidation (Disconneced forests) | Requires AD consolidation | No AD consolidation needed |
Plan for directory synchronization using Azure AD Connect Cloud Sync
The following list describes the various on-premises and Azure Active Directory (Azure AD) topologies that support Azure AD Connect Cloud Sync:
-
Single forest, single Azure AD tenant. The simplest topology is a single on-premises forest, with one or multiple domains, and a single Azure AD tenant. For an example of this scenario, see Microsoft Tutorial: A single forest with a single Azure AD tenant ↗️
-
Multi-forest, single Azure AD tenant. A common topology includes multiple AD forests, with one or multiple domains, and a single Azure AD tenant.
-
Existing forest with Azure AD Connect, new forest with cloud provisioning. This scenario is similar to the multi-forest scenario; however. this one involves an existing Azure AD Connect environment and then bringing on a new forest using Azure AD Connect Cloud Sync. For an example of this scenario, see Microsoft Tutorial: An existing forest with a new single Azure AD tenant ↗️
-
Piloting Azure AD Connect Cloud Sync in an existing hybrid AD forest. The piloting scenario involves the existence of both Azure AD Connect and Azure AD Connect Cloud Sync in the same forest. In this scenario, an object should be in scope in only one of the tools. For an example of this scenario: see Microsoft Tutorial: Pilot Azure AD Connect Cloud Sync in an existing synced AD forest ↗️
Organizations should keep the following information in mind when considering these topologies:
- Users and groups must be uniquely identified across all forests.
- Matching across forests doesn’t occur with Azure AD Connect Cloud Sync.
- A user or group must be represented only once across all forests.
- The source anchor for objects is chosen automatically. It uses ms-DS-ConsistencyGuid if present; otherwise, ObjectGUID is used.
- You can’t change the attribute that’s used for the source anchor.
Prerequisites for Azure AD Connect Cloud Sync
Organizations need the following to use Azure AD Connect Cloud Sync:
- A group Managed Service Account (gMSA). Azure AD Connect Cloud Sync supports and uses a gMSA for running the lightweight Cloud Sync agent. A gMSA is a managed domain account that:
- provides automatic password management.
- provides simplified service principal name (SPN) management.
- delegates the management to other administrators.
- extends this functionality over multiple servers.
-
Domain Administrator or Enterprise Administrator credentials to create the Azure AD Connect Cloud Sync gMSA (group Managed Service Account) to run the agent service.
-
A hybrid identity administrator account for your Azure AD tenant that’s not a guest user.
-
An on-premises server for the Cloud Sync agent with Windows 2016 or later. This server should be a tier 0 server based on the Active Directory administrative tier model. Installing the Cloud Sync agent on a domain controller is supported.
-
High availability refers to the Azure AD Connect Cloud Sync’s ability to operate continuously without failure for a long time. By having multiple active Cloud Sync agents installed and running, Azure AD Connect Cloud Sync can continue to function even if one agent should fail. It’s recommended that organizations have three active agents installed for high availability.
- On-premises firewall configurations.
Azure AD Connect Cloud Sync video
Microsoft has provided the community with a video that shows an excellent overview of Azure AD Connect Cloud Sync:
Migrate from Azure AD Connect to Azure AD Connect Cloud Sync
In the following sections, I will descripe a possible workflow for transition from Azure AD Connect to Azure AD Connect Cloud Sync.
Note: This may not be best-practice.
Scenario: A reasonably traditional Azure AD Connect configuration. In my demo environment, I have a have a single forest, single domain with a single domain controller with Azure AD Connect installed. I prefer to use Organization based synchronisation. By using this approach I am able to select which OUs (containing users and/or groups) that will be synchronized to Azure AD.
Step 1: Configuring Staging mode for Azure AD Connect
Start off by setting Azure AD Connect into Staging mode. This is so we can ensure that any changes made by deploying the new Azure AD Connect Cloud Sync are not being impacted by our existing Azure AD Connect implementation.
-
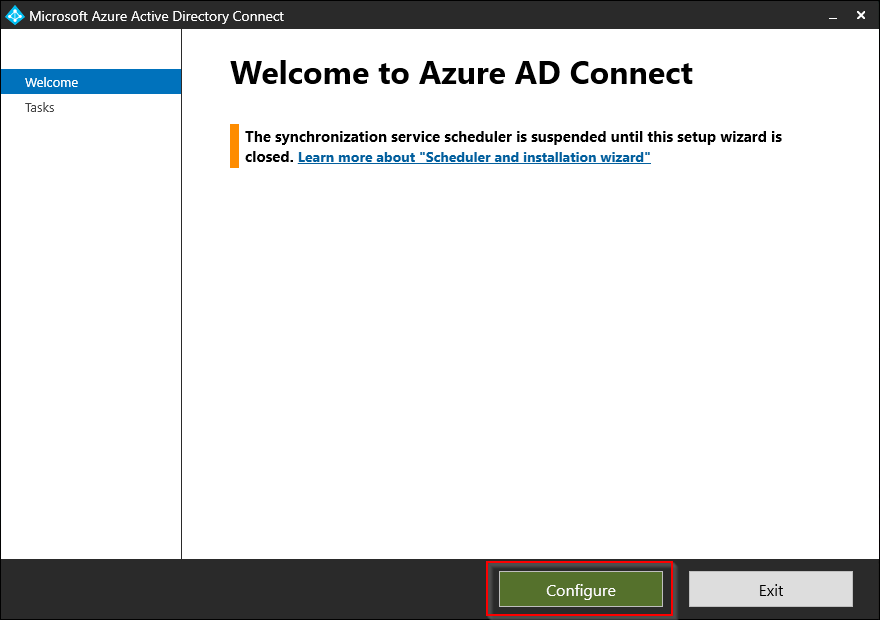
Start by opening Azure AD Connect on your server.
-
Select Configure.
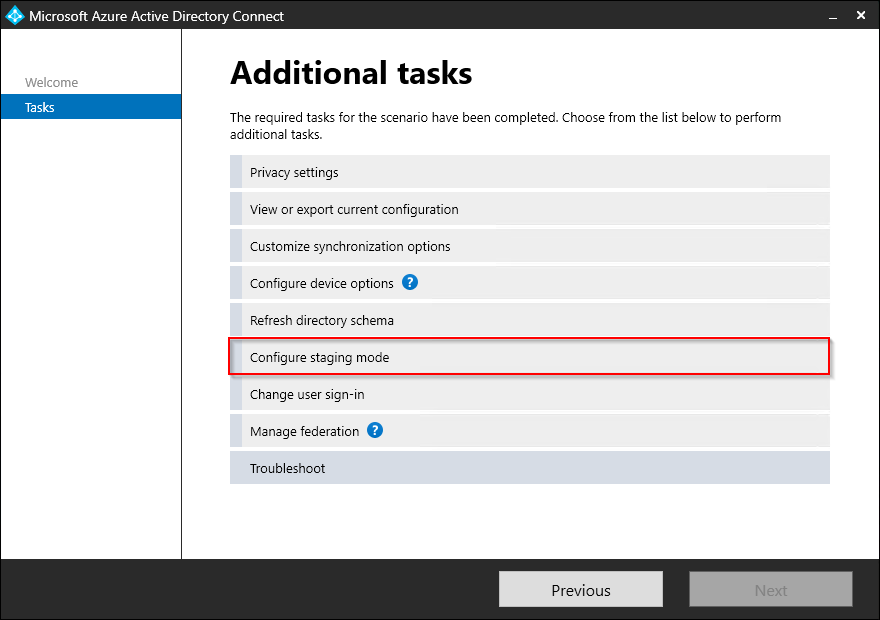
-
Select Configure staging mode and click Next.
-
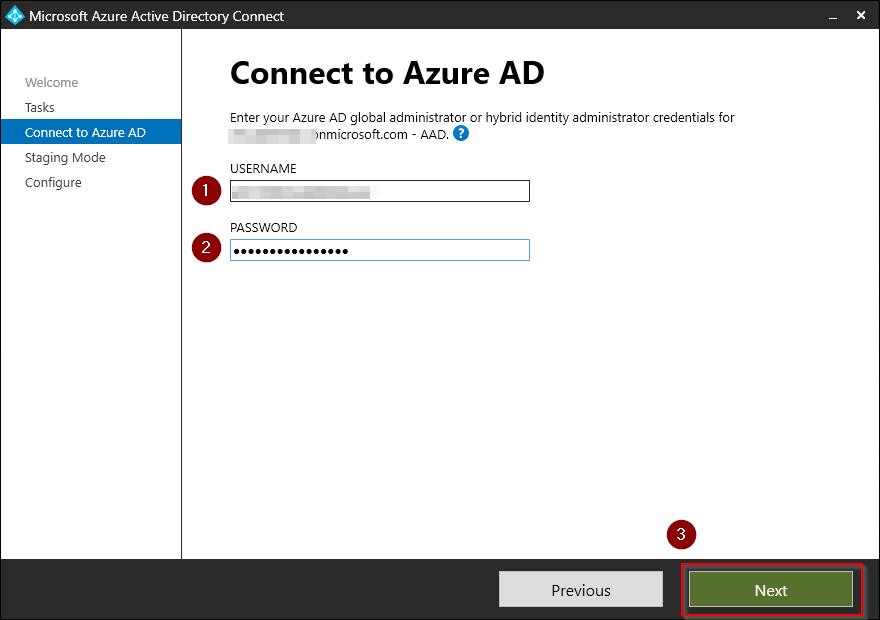
Log in with either your Azure AD Global Administrator or Hybrid Identity Administrator credentials and click Next.
-
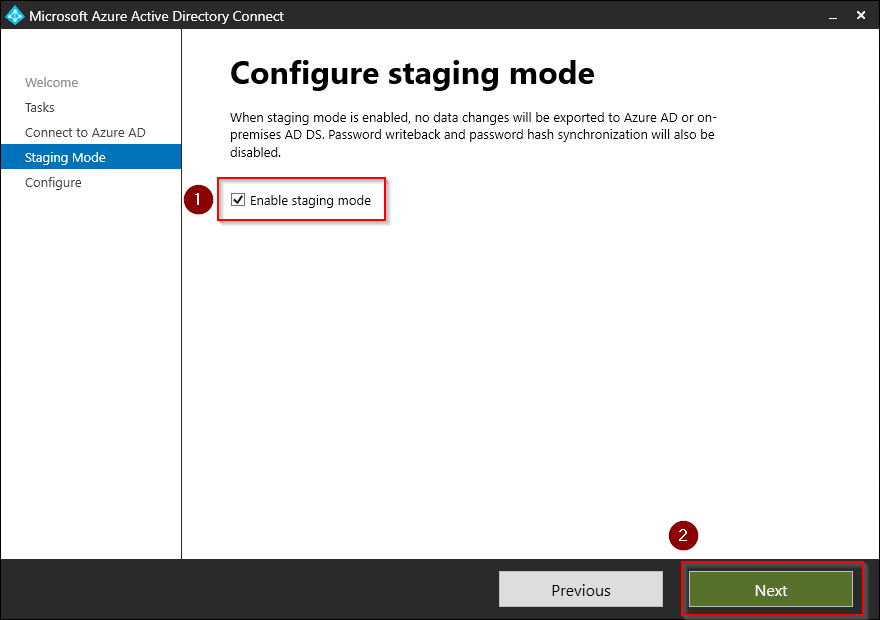
Check Enable stagning mode and click Next.
-
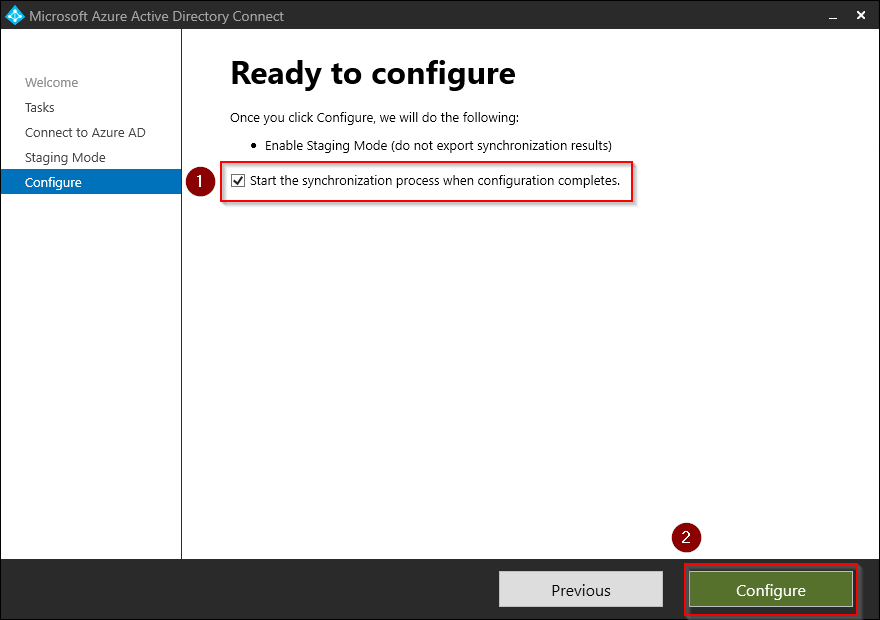
Verify that the Start the synchronization process when configuration completes checkbox is ticked off and then press Configure.
-
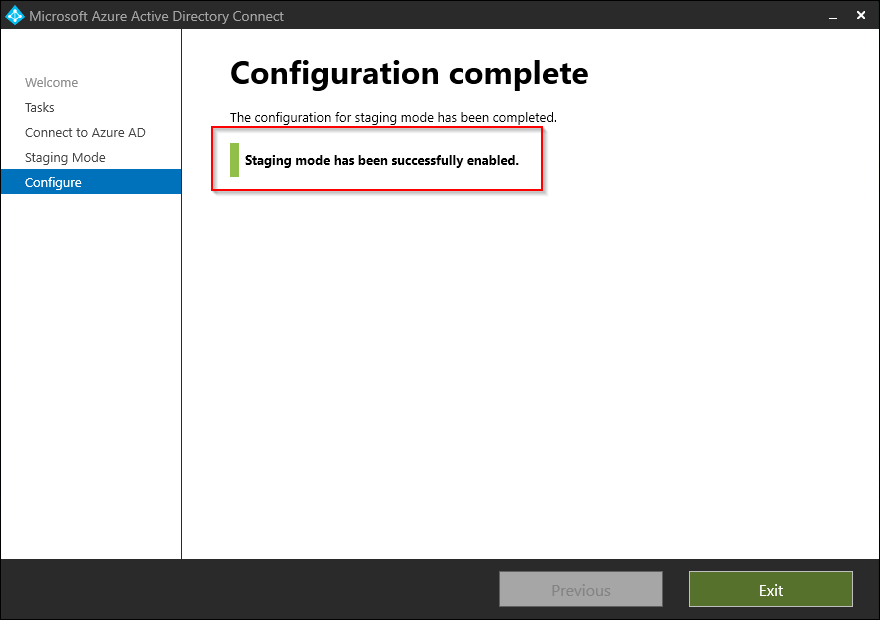
The configuration completes with a confirmation that the staging mode is successfully enabled. Press Exit to close the wizard.
You can also verify this by using PowerShell:
Get-ADSyncScheduler

AllowedSyncCycleInterval            : 00:30:00
CurrentlyEffectiveSyncCycleInterval : 00:30:00
CustomizedSyncCycleInterval         :
NextSyncCyclePolicyType             : Delta
NextSyncCycleStartTimeInUTC         : 05.01.2023 20:28:37
PurgeRunHistoryInterval             : 7.00:00:00
SyncCycleEnabled                    : True
MaintenanceEnabled                  : True
StagingModeEnabled                  : True
SchedulerSuspended                  : False
SyncCycleInProgress                 : False
(See that the returned property named StagingModeEnabled equals True in the code snippet above).
This completes step 1. In the next step we will download and install the Azure AD Connect Cloud Sync agent.
Step 2: Download and install the new Azure AD Connect Cloud Sync agent
Now that we have successfully put out existing Azure AD Connect instance in staging mode, we are ready to continue our migration. The next step is to download and install the lightweight Azure AD Connect Cloud Sync agent on the same server.
-
Start by logging into
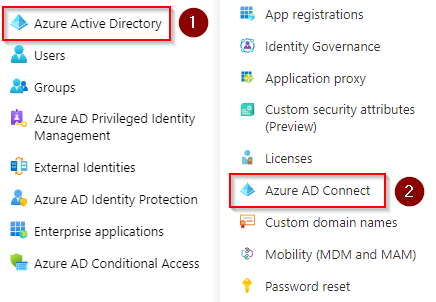
Azure Active Directory admin center: https://aad.portal.azure.com -
Select Azure Active Directory, then click Azure AD Connect.
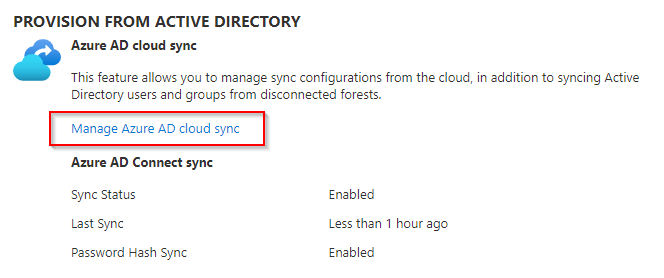
-
Select Manage Azure AD cloud sync, this will take you to the cloud sync configuration blade.
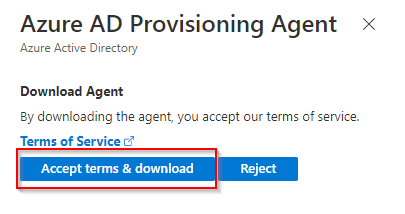
-
Press Download agent on the top menu and start the download the pressing the Accept terms & download button.

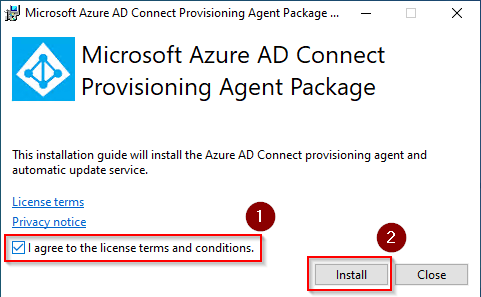
-
When the download is complete, run the installer. When prompted, agree to the terms and conditions and click Install.
-
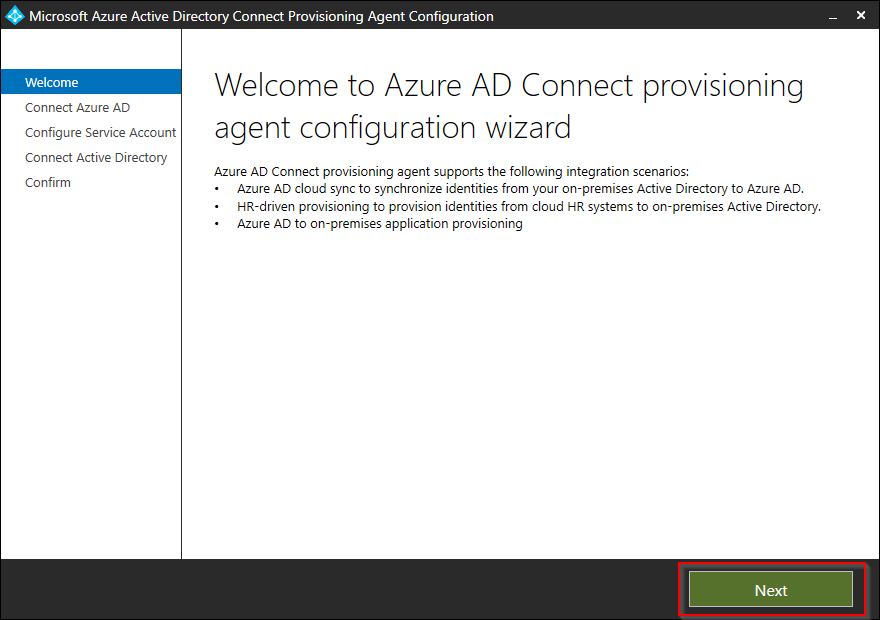
When the configuration wizard launches, click Next to continue.
-
On the Connect to Azure AD screen, the authentication box will immediately open and prompts you to sign in with your Azure AD Global Administrator or Hybrid Identity Administrator credentials. Complete the sign in process to continue.
-
The Configure Service Account screen opens. Select the Create gMSA options, then enter your Active Directory domain admin credentials to setup the gMSA account and click Next to continue.
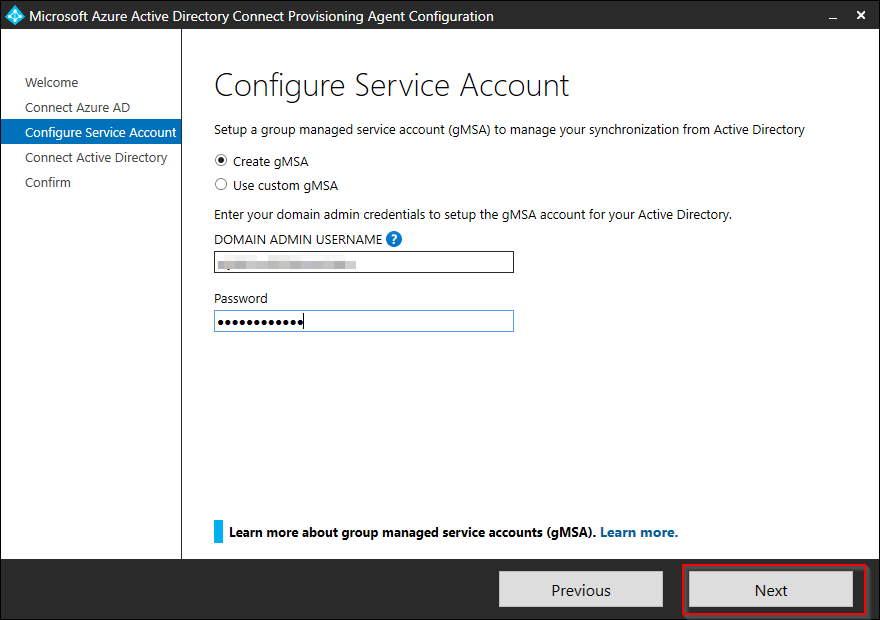
ℹ️ Tip If you want to read more about gMSA - Group Managed Service Accounts, see official Microsoft documentation found here↗️
-
On the Connect Active Directory screen, your domain should already be connected. If not, click Add directory to add your domain and click Next.

-
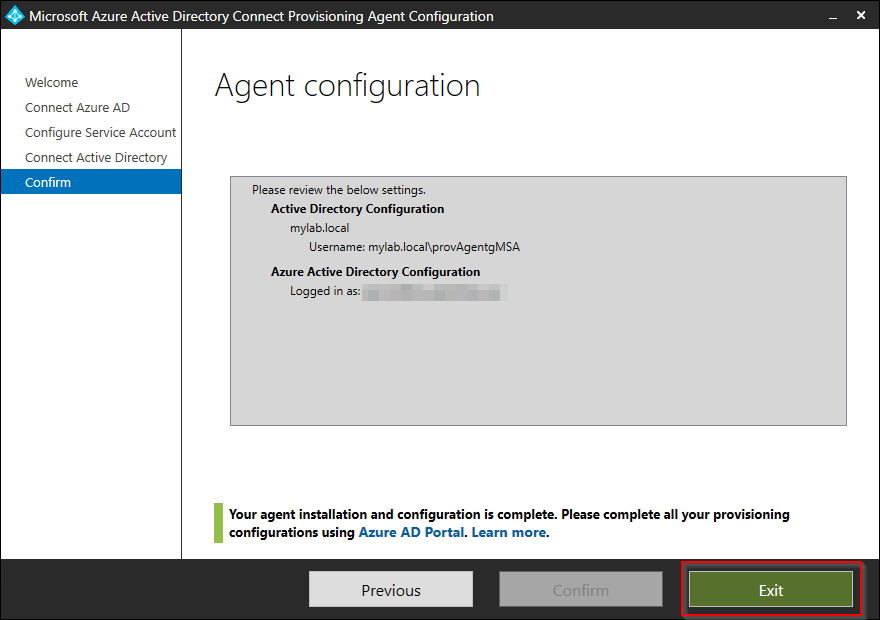
On the final page, you will see the name of the group managed service account that will be created. Press Confirm to complete the setup. This will take approx. 2 minutes.

-
Then the agent installation and configuration is completed, close the wizard by clicking Exit.
This completes step 2. In the next step we will configure and test synchronization to the cloud with our new Azure AD Connect Cloud Sync instance.
Step 3: Configure Azure AD Connect Cloud Sync
When the sync agent is successfully installed on our server, the rest of the configuration is done through Azure Active Directory admin center.
-
Start off by returning to the Azure AD Connect cloud sync configuration blade: https://aad.portal.azure.com/#view/Microsoft_AAD_Connect_Provisioning/ProvisioningManagementBlade
-
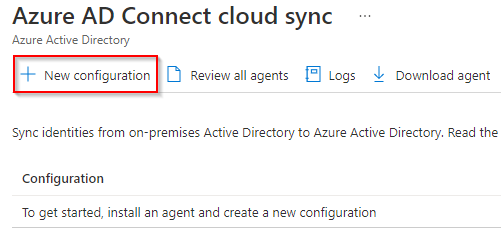
The New configuration options on the top menu is no longer greyed out. Select it.
-
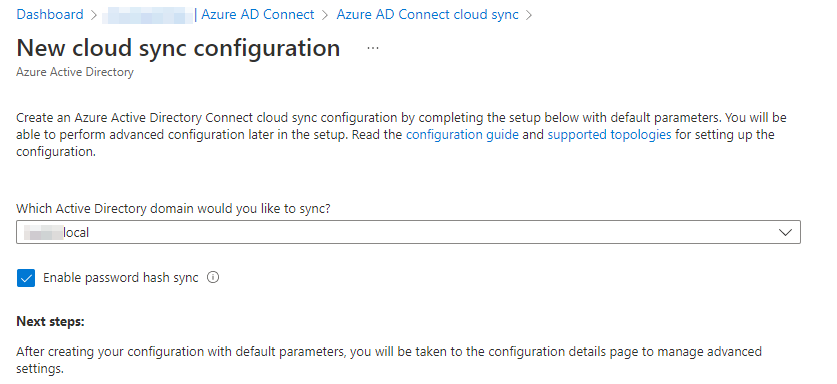
Under Which Active Directory domain would you like to sync, you should see only one (the domain you configured under step 2 in this tutorial). Re-enable password hash sync, and click the Create button at the bottom of the page.
-
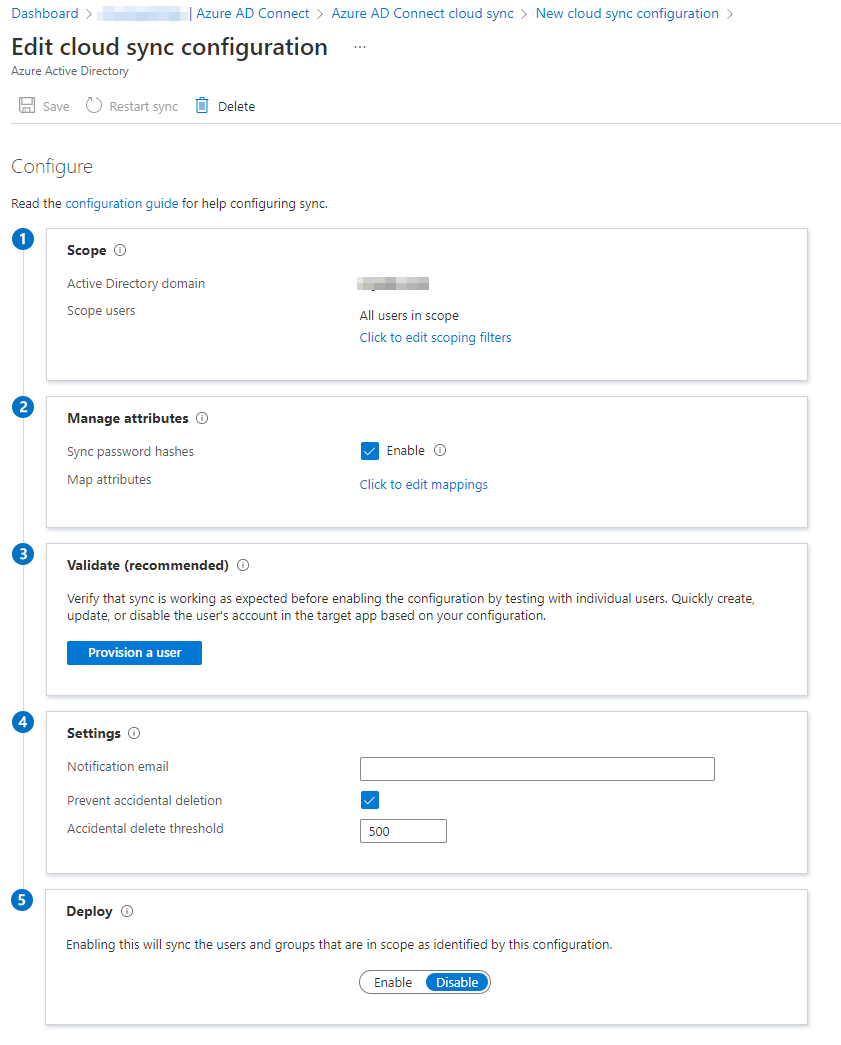
The cloud sync configuration will take 20-30 seconds to complete and then you will be redirected to the Edit cloud sync configuration blade.
-
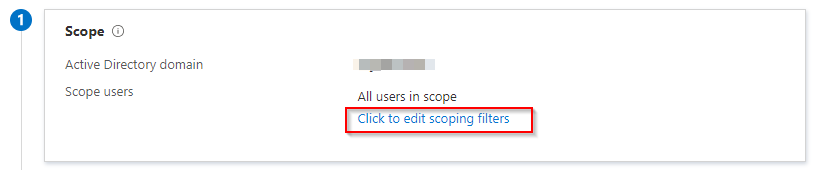
Start on the top and work your way down the numbered settings. Start at the Scope settings. Click Click to edit scoping filters.
-
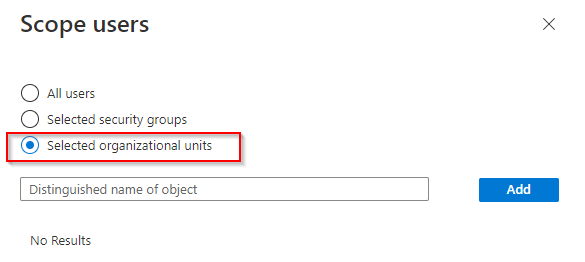
A flyout will appear on the right. Here you will have to option to filter by All users, Selected security groups or Selected organizational units. As mentioned before, I prefer to filter by organizational units. Select the radio button next to Selected organizational units. Now we need the distinguished name of the OU object we want to synchronize to Azure AD.
-
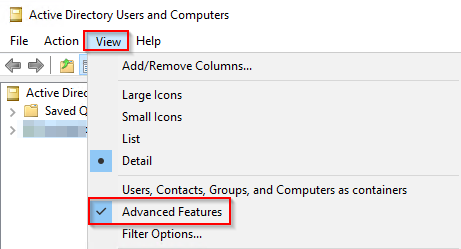
Head over to your server where you have access to Active Directory Users And Computers. Verify what you have enabled Advanced Features under View.
-
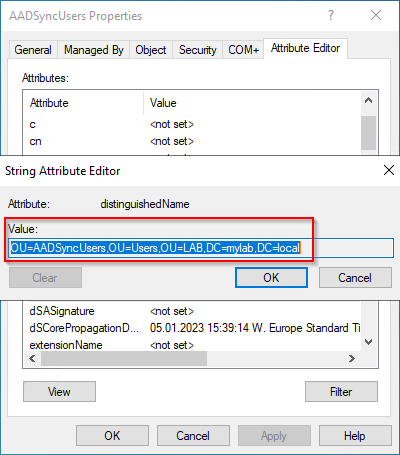
Right-click your target OU, and select Properties. Select the Attribute Editor tab and double-click on the distinguisedName value.
-
Copy the Value (right-click > Copy or Ctrl + C)
-
Paste the value into the textbox into your Scope users configuration and click the Add button. Repeat this process if you have additional OUs (or users/security groups ) that you wish to synchronize. Click Done button at the buttom of the blade then finished.

⚠️ Important! When migrating to Azure AD Connect Cloud Sync from an existing Azure AD Connect implementation, it is crusial that you include all previously synced AD objects. If not, you may find yourself in need of restoring deleted objects.
-
You can leave the Manage attributtes options as default unless your organization have some custom mapping of attributes. Ensure Sync password hashes are enabled.

-
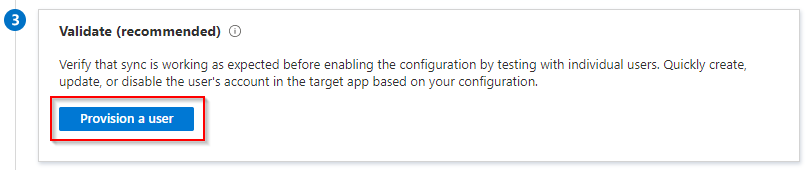
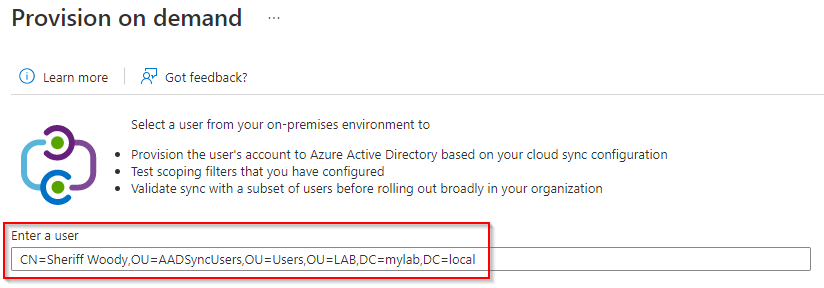
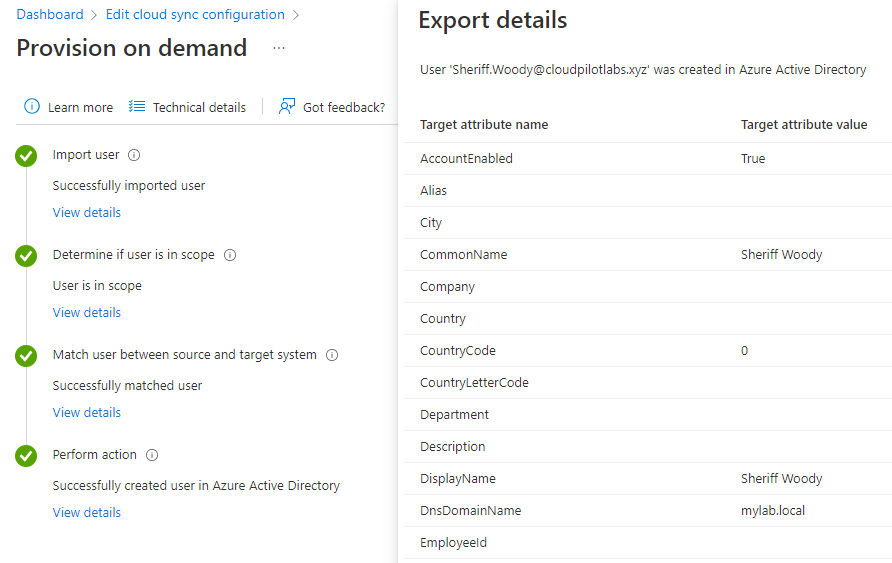
Under the Validate step, it is recommended that the sync is working as expected. Select the Provision a user button. Repeat the steps previously described in this tutorial to collect the distinguishedName value of your test user account in one of your already set up OUs. Paste the value on the Provision on-demand blade and click Provision.
-
Wait 5-10 seconds for the provisioning to complete. Click on the View details button under each step to get more insights and to verify that the settings display as expected. Click Finish button at the buttom of the page to continue.
-
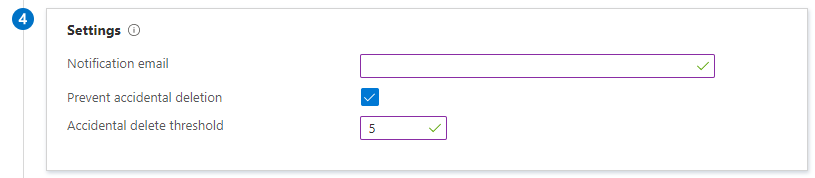
Under the Settings step, enter an email address to receive notifications when an error has occured. Also note that under this step, you’ll have the option to adjust the setting Prevent accidential deletion. I highly recommend that you leave this option on and adjust the threshold under Accidential delete threshold from the default value of 500 to somewhat more appropriate and manageable level.
-
In the final Deploy step, when ready, click Enable and then click Save at the top of the page.

This completes step 3. In our final step in this tutorial, we will complete the migration by removing the old instance of Azure AD Connect.
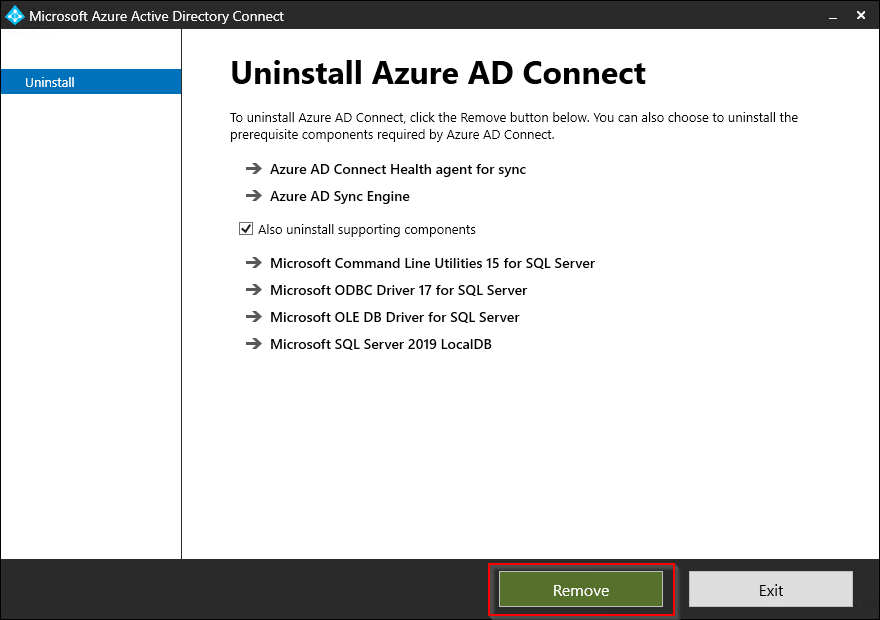
Step 4: Removal of Azure AD Connect agent
Now that Azure AD Connect Cloud Sync is installed successfully and running, we ar ready to uninstall the old Azure AD Connect instance.
-
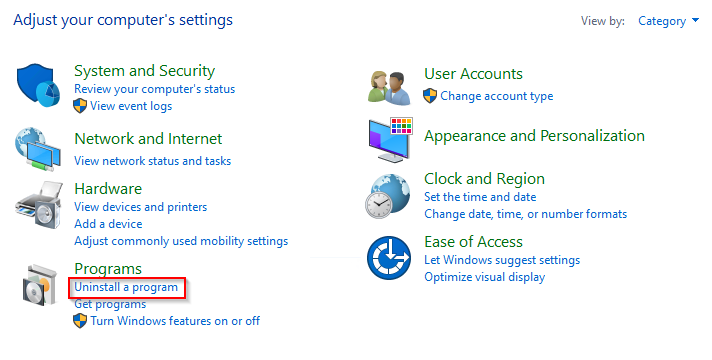
On your server, open the Control panel, under Programs, select Uninstall a program.
-
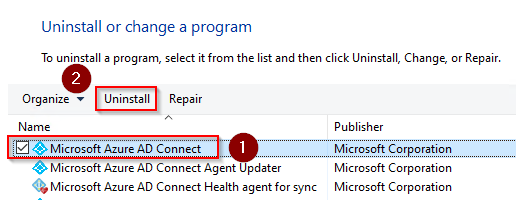
Select Microsoft Azure AD Connect and click Uninstall.
-
Leave the defaults and click Remove.
-
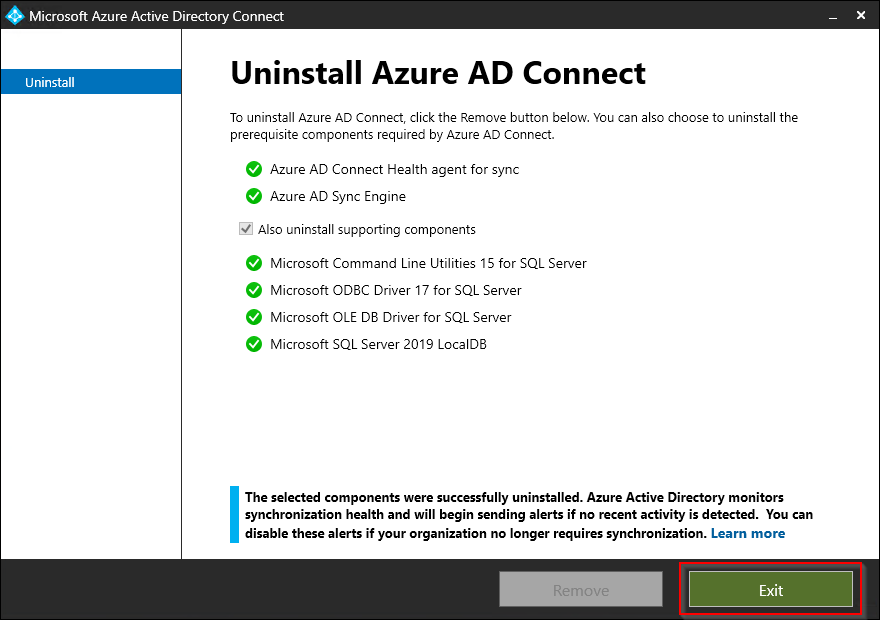
Wait for the unistall to complete. When finished, click Exit.
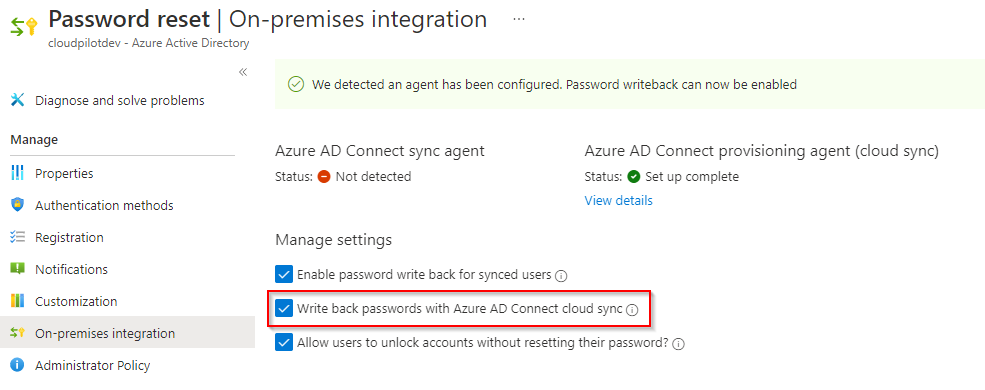
Enable password writeback in Azure AD Connect Cloud Sync
You can enable password writeback for your synced users from on-premises directories directly in the Azure portal or through PowerShell.
- Azure portal:
- Sign in to the Azure portal using a
Global Administrator account. - Search for and select Azure Active Directory, select Password reset, then choose On-premises integration.
- Check the option for Write back passwords to your on-premises directory.
- If Azure AD Connect provisioning agents are detected, you can additionally check the option for Write back passwords with Azure AD Connect cloud sync.
- Sign in to the Azure portal using a
- Powershell:
With PowerShell you can enable Azure AD Connect cloud sync by using the
Set-AADCloudSyncPasswordWritebackConfigurationcmdlet on the servers with the provisioning agents. You will need global administrator credentials:Import-Module "C:\Program Files\Microsoft Azure AD Connect Provisioning Agent\Microsoft.CloudSync.Powershell.dll" Set-AADCloudSyncPasswordWritebackConfiguration -Enable $true -Credential (Get-Credential)
Monitoring
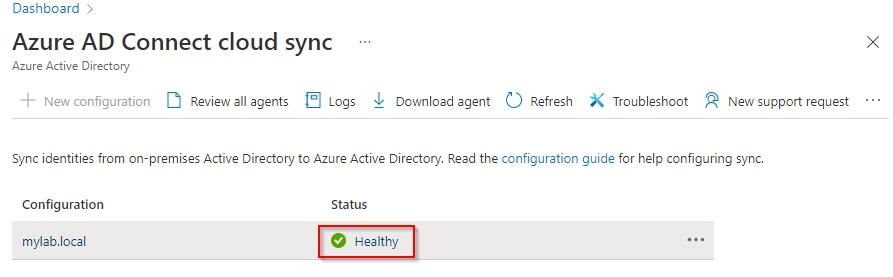
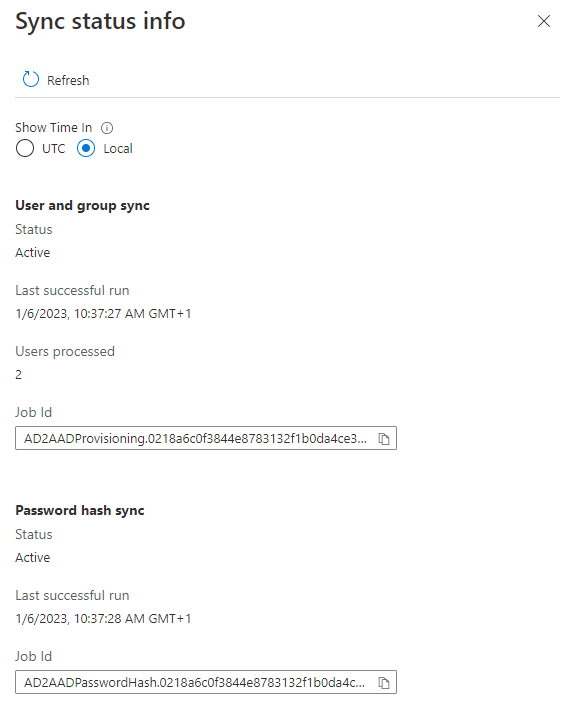
View sync status info
Under the Azure AD Connect cloud sync blade, under Configuration you’ll see your installed agents. Click the Status state to see the status of your agent configuration.
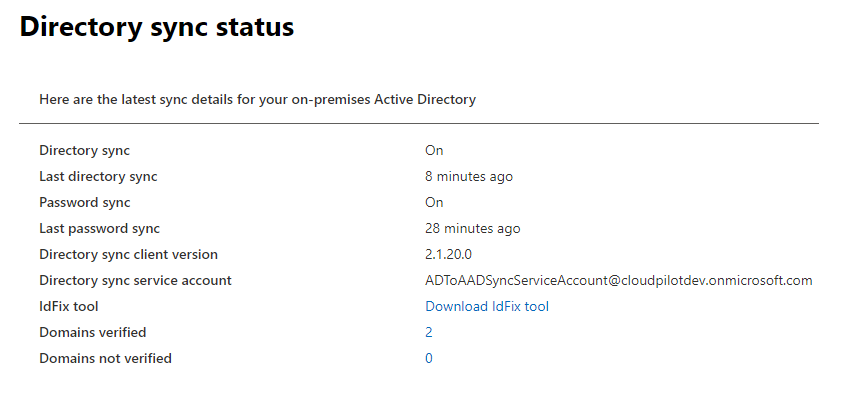
Directory sync status
After Azure AD Connect Cloud Sync is successfully installed, you’ll notice that there are created a new service principal for the directory sync. The account details and more information can be seen in the Microsoft 365 admin center, under Health, Directory sync status.
Logging
-
On the server where Azure AD Connect Cloud Sync is installed: By default, the agent emits minimal error messages and stack trace information. You can find these trace logs in the following folder:
C:\ProgramData\Microsoft\Azure AD Connect Provisioning Agent\Trace. -
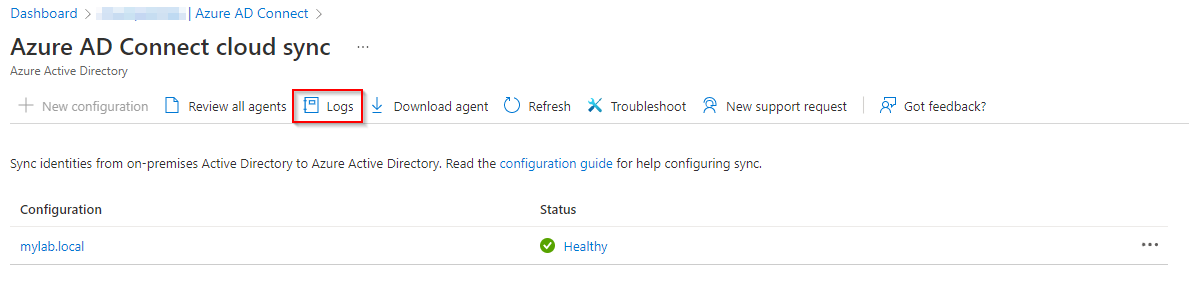
In Azure: Under Manage Azure AD Cloud sync under Azure AD Connect in the Azure portal, on the top of the page, you’ll find the Logs button. Click on it to view the Provisioning Logs. This is a great tool for monitoring and get insights into the objects being synchronized between your on-premises Active Directory environment and Azure AD. There is also an Download button for exporting the log into JSON or CSV format.
Manage Azure AD Connect Cloud Sync using PowerShell
No blog post without some PowerShell ![]()
Microsoft has provided us with a PowerShell module named AADCloudSyncTools.
The AADCloudSyncTools module provides a set of useful tools that can help you manage your deployments of Azure Active Directory Connect (Azure AD Connect) cloud sync.
Install the AADCloudSyncTools PowerShell module
-
Open Windows PowerShell with administrative privileges.
-
Run
Import-module -Name "C:\Program Files\Microsoft Azure AD Connect Provisioning Agent\Utility\AADCloudSyncTools". -
To verify that the module was imported, run
Get-module AADCloudSyncTools.You should now see information about the module.
-
To install the AADCloudSyncTools module prerequisites, run
Install-AADCloudSyncToolsPrerequisites. -
On the first run, the PowerShellGet module will be installed if it’s not present. To load the new PowerShellGet module, close the PowerShell window and open a new PowerShell session with administrative privileges.
-
Import the module again by running
Import-module -Name "C:\Program Files\Microsoft Azure AD Connect Provisioning Agent\Utility\AADCloudSyncTools". -
Run
Install-AADCloudSyncToolsPrerequisitesagain to install the MSAL and Azure AD modules. All prerequisites should now be installed.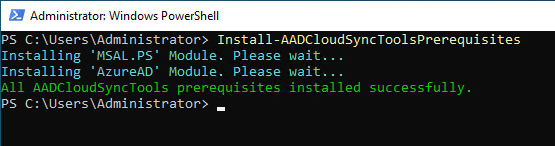
-
Every time you want to use the
AADCloudSyncToolsmodule in a new PowerShell session, run the following command:
Import-Module "C:\Program Files\Microsoft Azure AD Connect Provisioning Agent\Utility\AADCloudSyncTools"
AADCloudSyncTools cmdlet overview
| Name | Description |
|---|---|
| Connect-AADCloudSyncTools | This cmdlet uses the MSAL.PS module to request a token for the Azure AD administrator to access Microsoft Graph. |
| Export-AADCloudSyncToolsLogs | This cmdlet exports and packages all the troubleshooting data in a compressed file. See details found here. |
| Get-AADCloudSyncToolsInfo | This cmdlet shows Azure AD tenant details and the state of internal variables. |
| Get-AADCloudSyncToolsJob | This cmdlet uses Microsoft Graph to get Azure AD service principals and returns the sync job’s information. You can also call it by using the specific sync job ID as a parameter. |
| Get-AADCloudSyncToolsJobSchedule | This cmdlet uses Microsoft Graph to get Azure AD service principals and returns the sync job’s schedule. You can also call it by using the specific sync job ID as a parameter. |
| Get-AADCloudSyncToolsJobSchema | This cmdlet uses Microsoft Graph to get Azure AD service principals and returns the sync job’s schema. |
| Get-AADCloudSyncToolsJobScope | This cmdlet uses Microsoft Graph to get the sync job’s schema for the provided sync job ID and outputs all filter groups’ scopes. |
| Get-AADCloudSyncToolsJobSettings | This cmdlet uses Microsoft Graph to get Azure AD service principals and returns the sync job’s settings. You can also call it by using the specific sync job ID as a parameter. |
| Get-AADCloudSyncToolsJobStatus | This cmdlet uses Microsoft Graph to get Azure AD service principals and returns the sync job’s status. You can also call it by using the specific sync job ID as a parameter. |
| Get-AADCloudSyncToolsServiceAccount | Returns the Azure AD Cloud Sync Service Account |
| Get-AADCloudSyncToolsServicePrincipal | This cmdlet uses Microsoft Graph to get the service principals for Azure AD and/or Azure Service Fabric. Without parameters, it will return only Azure AD service principals. |
| Install-AADCloudSyncToolsPrerequisites | This cmdlet checks for the presence of PowerShellGet v2.2.4.1 or later, the Azure AD module, and the MSAL.PS module. It installs these items if they’re missing. |
| Invoke-AADCloudSyncToolsGraphQuery | This cmdlet invokes a web request for the URI, method, and body specified as parameters. |
| Remove-AADCloudSyncToolsGroupMembers | Searches members of Azure AD group in AD and prompts the members not found in AD for removing from Azure AD |
| Repair-AADCloudSyncToolsAccount | This cmdlet uses Azure AD PowerShell to delete the current account (if present). It then resets the sync account authentication with a new sync account in Azure AD. |
| Restart-AADCloudSyncToolsJob | This cmdlet restarts a full synchronization. |
| Resume-AADCloudSyncToolsJob | This cmdlet continues synchronization from the previous watermark. |
| Set-AADCloudSyncToolsJobSchema | Uses Graph to get AD2AAD Service Principals and returns the Synchronization Job’s Schema. |
| Set-AADCloudSyncToolsTenantId | This can be used when the Cloud Sync Agent is not currently installed or it is installed but you want to target a different Azure AD tenant than the one Cloud Sync Agent is using. The TenantId set with this function will only persist during the PowerShell session and you’ll need to call this function before using Connect-AADCloudSyncTools. |
| Start-AADCloudSyncToolsVerboseLogs | This cmdlet modifies AADConnectProvisioningAgent.exe.config to enable verbose tracing and restarts the AADConnectProvisioningAgent service. You can use -SkipServiceRestart to prevent service restart, but any configuration changes will not take effect. You can find these trace logs in the folder C:\ProgramData\Microsoft\Azure AD Connect Provisioning Agent\Trace. |
| Stop-AADCloudSyncToolsVerboseLogs | This cmdlet modifies AADConnectProvisioningAgent.exe.config to disable verbose tracing and restarts the AADConnectProvisioningAgent service. You can use -SkipServiceRestart to prevent service restart, but any configuration changes will not take effect. |
| Suspend-AADCloudSyncToolsJob | This cmdlet pauses synchronization. |
Additional useful resources
-
Frequently asked questions: Aure Active Directory Connect cloud sync FAQ
-
Read the official configuration guide from Microsoft for further details into creating a hybrid identity environment using Azure Active Directory (Azure AD) Connect cloud sync.
-
For troubleshooting tips, see this article: Cloud sync troubleshooting.
Comments