
Using Single Sign-On with Azure AD Connect Cloud Sync
What is Azure Active Directory Seamless Single Sign-On?
Azure Active Directory Seamless Single Sign-On (Azure AD Seamless SSO) automatically signs users in when they are on their corporate devices connected to your corporate network. When enabled, users don’t need to type in their passwords to sign in to Azure AD, and usually, even type in their username. This feature provides your users easy access to your cloud-based applications without needing any additional on-premises components.
I recommend reading my previous blog post, Deep dive: Hybrid Identity using Azure AD Connect Cloud Sync, before continuing with the steps below.
The time to migrate from Azure AD Connect to Azure AD Connect Cloud Sync is now.
Setup
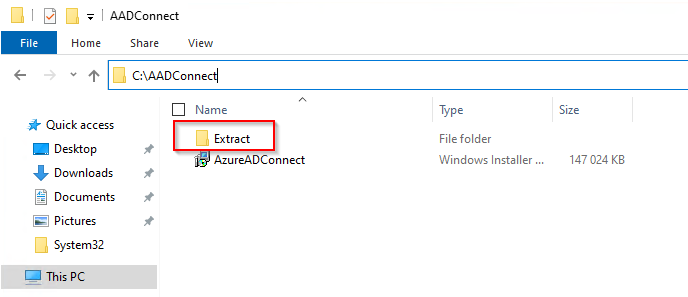
Step 1: Download and extract Azure AD Connect files
-
Start off by downloading the latest version of Azure AD Connect↗️
-
Open a PowerShell window (as administrator) and navigate to the msi file you just downloaded.
In this guide I have placed the msi file in a new folder named
AADConnect, right below theC:drive.
-
Run the following:
msiexec /a C:\AADConnect\AzureADConnect.msi /qb TARGETDIR=C:\AADConnect\<Desired name of subfolder>Remember to change the filepath and name the subfolder to match your file path and desired name. This will extract the files under the new sub-folder named after your choice.
In the example below I extracted the files to a sub-folder named
Extract.

Step 2: Import the Seamless SSO PowerShell module
-
Download and install Azure AD Powershell↗️
-
In your PowerShell window, navigate to your
ExtractFolder\Microsoft Azure Active Directory Connectfolder. -
Import the
Seamless SSOPowerShell module by using this command:Import-Module .\AzureADSSO.psd1.

Step 3: Get the list of Active Directory forest on which Seamless SSO has (already) been enabled
- In your PowerShell window (as you already have successfully imported the
AzureADSSOmodule in), call theNew-AzureADSSOAuthenticationContextcmdlet. When prompted, enter your tenant’s Global Administrator credentials.

- Next, call the
Get-AzureADSSOStatuscmdlet. This command provides you with the list of Active Directory forests (look at the “Domains” list in the output) on which this feature has (already) been enabled.

Step 4: Enable Seamless SSO for each Active Directory forest
- Call the
Enable-AzureADSSOForestcmdlet. When prompted, enter the domain administrator credentials for the intended Active Directory forest.
ℹ️ Note The domain administrator credentials username must the entered in the SAM account name format (example:
mydomain\johndoeormydomain.com\johndoe).
- Repeat the preceding step for each Active Directory forest where you want to setup the feature.
Step 5: Enable the feature on your tenant
To turn on the feature on your tenant, call Enable-AzureADSSO -Enable $true.

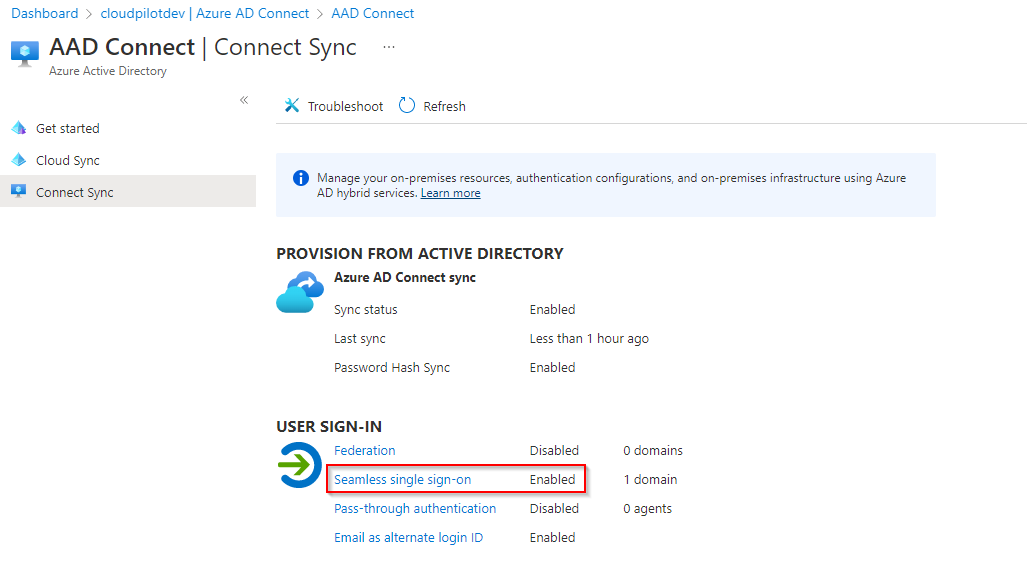
Verify
Follow this steps in the Azure portal to verify that you have enabled Seamless SSO correctly:
-
Sign in to the Azure Active Directory administrative center↗️ with a Global Administrator or Hybrid Identity Administrator credentials of your tenant.
-
Select Azure Active Directory in the left pane.
-
Select Azure AD Connect.
-
Select Connect Sync.
-
Verify that the Seamless single sign-on feature appears as Enabled.
Roll out the feature
After you have verified that Seamless SSO has been successfully enabled, it’s time to roll out the feature to your end-users.
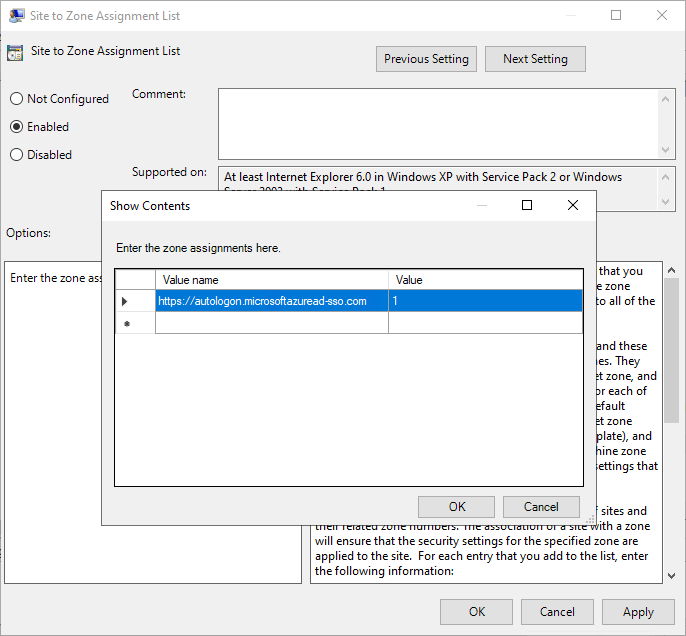
You start by adding the following Azure AD URL to all or selected user’s Intranet zone settings by using Group Policy in Active Directory:
https://autologon.microsoftazuread-sso.com
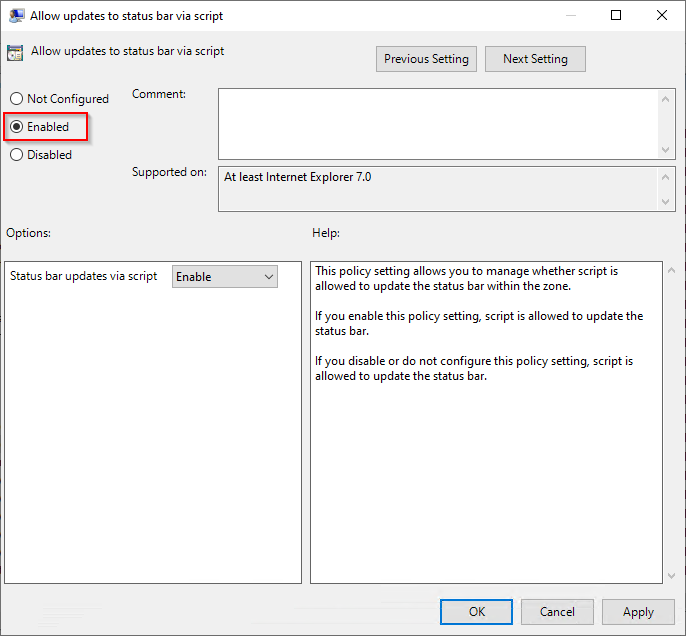
In addition, you need to enable an Intranet zone policy setting called Allow updates to status bar via script through Group Policy.
Detailed steps
-
Open the Group Policy Management Editor tool.
-
Edit the group policy that’s applied to some or all your users. This example uses Default Domain Policy.
-
Browse to User Configuration > Policies > Administrative Templates > Windows Components > Internet Explorer > Internet Control Panel > Security Page. Then select Site to Zone Assignment List.
-
Enable the policy, and then enter the following values in the dialog box:
-
Value name:
https://autologon.microsoftazuread-sso.com. The Azure AD URL where the Kerberos tickets are forwarded. -
Value (Data):
1. This indicates the Intranet Zone.
-
Select OK and then select OK again.
-
Browse to User Configuration > Policies > Administrative Templates > Windows Components > Internet Explorer > Internet Control Panel > Security Page > Intranet Zone. Then scroll down until you find Allow updates to status bar via script.
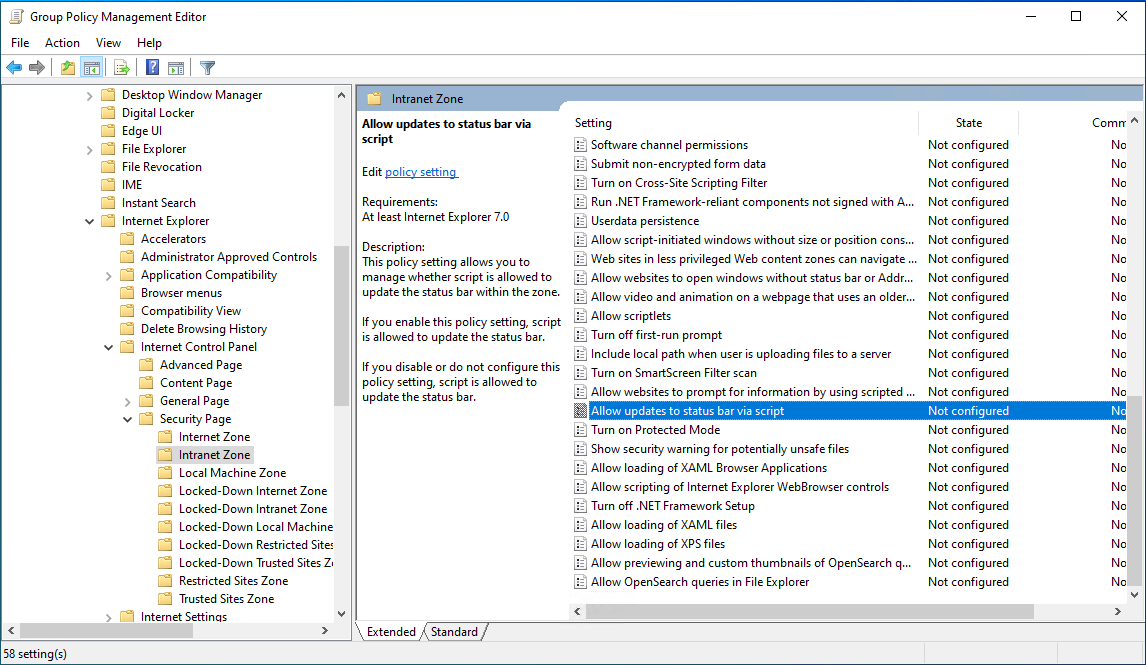
- Enable the policy setting, and then select OK.
Test the feature
To test the feature for a specific user, ensure that all the following conditions are in place:
- The user signs in on a corporate device
- The device is joined to your Active Directory domain. The devices doesn’t need to be Azure AD Joined.
- The device has a direct connection to your Domain Controller (DC), either on the corporate wired or wireless network or via a remote access connection, such as a VPN connection.
- You have rolled out the feature to this user throught Group Policy.
To test the scenario where the user enters only the username, but not the password:
- Sign in to
https://myapps.microsoft.com.
To test the scenario where the user doesn’t have to enter the username or the password, use one of these steps:
-
Sign in to
https://myapps.microsoft.com/Tenantname.onmicrosoft.comReplace Tenantname with the name of your tenant. -
Sign in to
https://myapps.microsoft.com/domain.comReplace domain.com with one of your tenants verified domains.
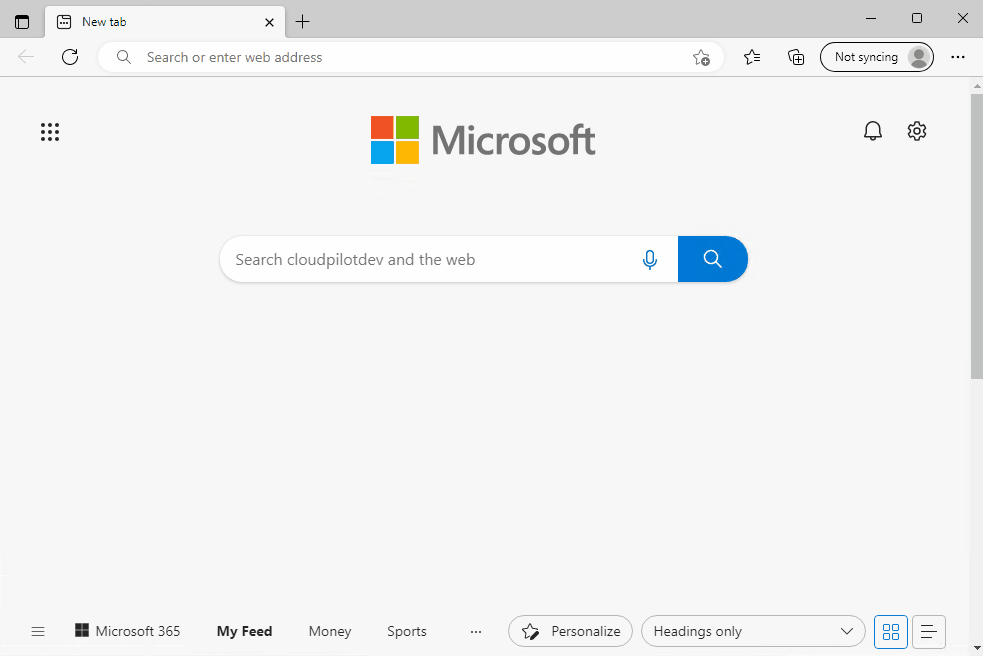
Below is an example of the sign-in experience after Seamless SSO has been enabled:
Disable Single Sign-On
Perform the follwing steps on the on-premises server where you have the Azure AD Connect Cloud Sync agent installed:
Step 1. Disable the feature on your tenant:
-
You need to have the Azure AD PowerShell module installed. You should already have this in place, as this one is a prerequisite for enabling Single Sign-On in the first place. If you need to re-install it, see guidance found here↗️
-
Open a new PowerShell window (as administrator) and navigate to the path where you extracted the files from Azure AD Connect under the Setup section in this blog post > Step 3.
-
Import the
Seamless SSOPowerShell module:Import-Module .\AzureADSSO.psd1. -
Call the
New-AzureADSSOAuthenticationContextcmdlet. A popup windows should open. Log in using either aGlobal Administratoror aHybrid Identity Administratoraccount. -
Call
Enable-AzureADSSO -Enable $falseto disable SSO.
Step 2. Get a list of AD forests where Seamless SSO has been enabled:
Call Get-AzureADSSOStatus | Convert-FromJson. This command provides you with a list of AD forests (look at the “Domains” list) on which this feature has been enabled.
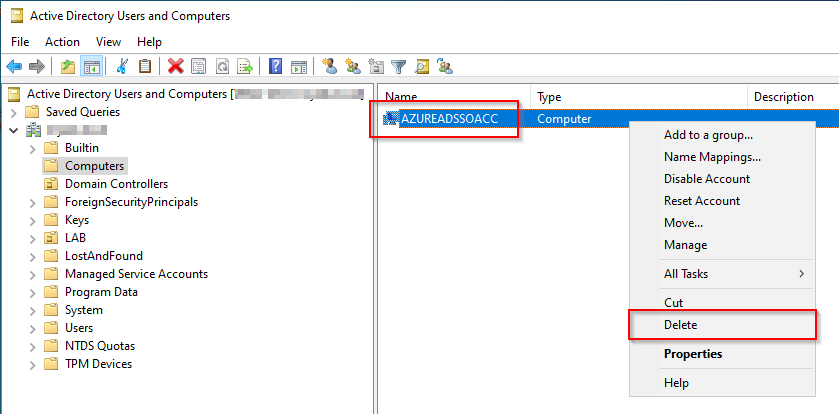
Step 3. Manually delete the AZUREADSSOACC computer account from each AD forests that you see listed:
Comments